Why is my tyre losing air pressure?
A tyre can typically lose between 1 and 3 psi each month. However, if you neglect your tyres for 6 months, you could lose up to 6 or 8 psi, so it is important to check your tyres at least once a month.
If your tyre is losing more air pressure than the typical rate, it could be that you have a slow leak. It’s important to fix a slow leak as soon as possible as driving on underinflated tyres can cause irregular or unpredictable vehicle behaviour or even a dangerous blowout.
How do I find a slow leak on a tyre?
If your tyre has a slow leak and you can’t figure out why as there is no obvious puncture, your tyre valve or core may be damaged or need cleaning.
Slow leaks may also be caused by damage to the tyre valve stem, wheel, bead, sidewall or tread. This damage may be caused by deterioration over time or by harsh road conditions.
You can use one of the following methods to find a slow leak.
![]()
Listen for the air leak
Sometimes you will be able to hear a hissing sound, which will get louder the closer you are to the leak. Simply place your hand over the area and you should feel whether air is escaping.
![]()
Use soapy water
Another popular method is to use soapy water. Simply spray a mixture of dishwashing soap and water over the uncapped tyre valve stem. If the valve is leaking, then bubbles will appear. If there are no bubbles, then this indicates that you could have a slow leak elsewhere in the tyre. You can pour some on the tyre tread and sidewalls, to find the leak.
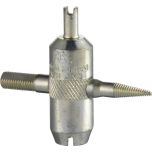
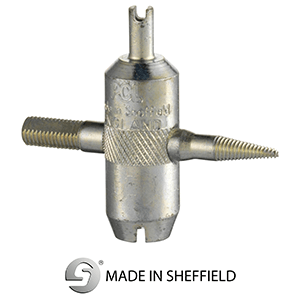
If your tyre valve is leaking, using a 4-in-1 Tyre Valve Tool, such as PCL’s TVT01, can make repairing the tyre valve and replacing the core quick, easy and inexpensive.
How do I use a TVT01 4-in-1 Tyre Valve Tool?
Step-by-step guide
[Scroll down to watch the video]
|
|
|
|||
Step 1. Remove the tyre or jack up the vehicle
Step 2. Remove the tyre valve cap
Make sure to keep the tyre valve cap somewhere safe!
Before using the tool make sure you've got very little or no air pressure in the tyre. Removing the core whilst there is pressure in the tyre, may cause the core valve itself to fly out at a potentially dangerous speed causing eye injuries.
Step 3. Remove the tyre valve core
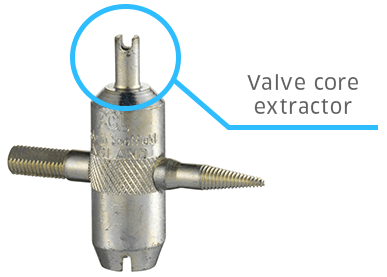
Safety Tip - Wear safety glasses when removing the core
Using the valve core removal section of the tool, engage the core and twist anti-clockwise. Once the core is half-way out, you will be able to remove it using your hands.
Inspect the core, if damaged you will need to replace it with a new one.
Step 4. Clean and rethread the external valve
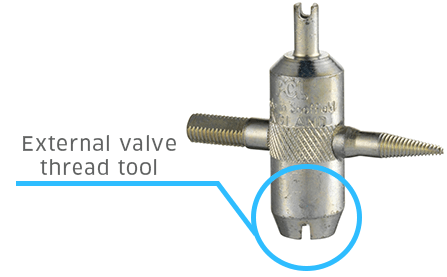
Simply screw down the external valve thread and cleaning section of the tool, this will remove any burrs or damage and rethread the external valve.
Step 5. Clean and rethread the internal valve
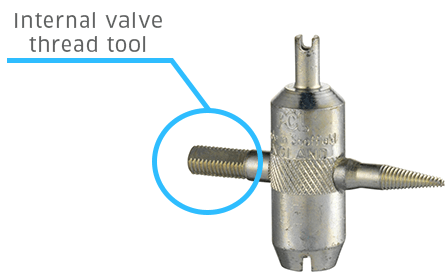
Using the internal valve thread and cleaning section of the tool, simply screw down on the valve, take care not to damage the valve stem, this will clean out the valve and remove any burrs or damage and rethread the internal valve.
Step 6. Repair and clean the valve seat 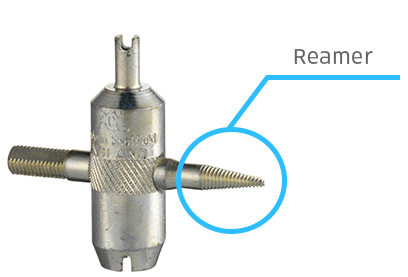
To clean the very internal part of the valve where the core itself sits, use the reamer (the pointy end of the tool).
Carefully insert the tool, this will clean and make sure there is no rubber on the core valve seat itself, if that’s been damaged.
Step 7. Replace the tyre valve core and make sure it is secure!
Insert the valve core. Using the tool simply screw the core clockwise into position. Make sure it is tight, you will feel some resistance, however make sure not to over tighten as this could lead to damaging your tyre valve stem.
Step 8. Inflate your tyres to the recommended pressure
Make sure to inflate all of your tyres to the manufacturers reccomended pressure. You will find this information in the form of a chart in the owner’s manual or on the driver side door frame. This will show the correct tyre pressure, marked in PSI and BAR.
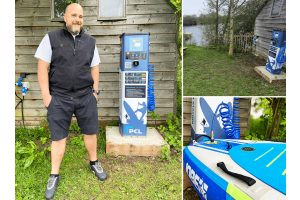
Do you have a PCL Tyre Inflator and are not sure how to use it? We have a range of handy videos covering how to use our most popular tyre inflators including the MK4 range, also a handy video on how to inflate your tyres on a forecourt.
Step 9. Replace the tyre valve cap
Step 10. Check your tyre pressure in a few days
To check if the slow leak as been resolved, check the pressure of the repaired tyre and compare to the opposite tyre, if they are the same, the problem has been fixed.
Repeat these 10 steps regularly to keep your tyre valves in top condition.
It’s good practice to look after your tyre valves, using a 4-in-1 Tyre Valve Tool can help prevent any slow leaks in your tyre valves.
Watch the demonstration